
How to Perform Accelerated Stability Testing for Peptides
Table of Contents
- What You’ll Need Before Starting Accelerated Stability Testing
- Step 1: Define Your Stability Protocol and Objectives
- Step 2: Prepare Samples and Set Environmental Stress Conditions
- Step 3: Apply ICH Q1A(R2) Stability Testing Guidelines
- Step 4: Analyze Degradation Kinetics and Data Extrapolation
- Understanding Stability Testing Duration for Research Peptides
- Long Term Stability of Lyophilized Peptides: What Accelerated Data Can and Cannot Tell You
- Troubleshooting Failed Stability Tests and Reducing Costs
- Frequently Asked Questions
Last Updated: September 30, 2026
What You’ll Need Before Starting Accelerated Stability Testing
Accelerated stability testing exposes a drug product to elevated stress conditions to predict shelf life faster than real-time studies. For research peptides, a vial that looks fine today can lose potency within weeks under heat and humidity.
Before you begin, gather:
- A validated stability-indicating assay, usually RP-HPLC
- An environmental chamber with temperature and humidity control
- Reference standards and a calibration curve
- A sample log with lot numbers and storage dates
- A statistical plan for degradation kinetics
Running accelerated testing without a stability-indicating method is the most common mistake. If your HPLC method cannot resolve a degradation peak from the main peptide peak, your data will look clean when the sample is already breaking down.
Step 1: Define Your Stability Protocol and Objectives
Write your protocol first: what you are testing, how long, at what conditions, and what counts as a pass.
Your protocol should cover:
- The peptide sequence and lot number under test
- Test intervals (baseline, then set timepoints)
- Storage conditions per arm
- Assay method and acceptance limits
- Who signs off on out-of-specification results
Setting Acceptance Criteria for Peptide Purity
Set limits before you run anything, not after seeing the data. Typical criteria:
- Purity by HPLC stays within a defined range of the release value
- No new impurity peak exceeds a set threshold
- Appearance and reconstitution behavior stay unchanged
Run a baseline assay on three separate vials from the same lot. If the three results disagree by more than your method’s stated precision, your sampling or method is the problem, not the peptide.
Step 2: Prepare Samples and Set Environmental Stress Conditions
Sample prep decides whether your data means anything. Use the same container, fill volume, and headspace across every arm so stress is the only variable.
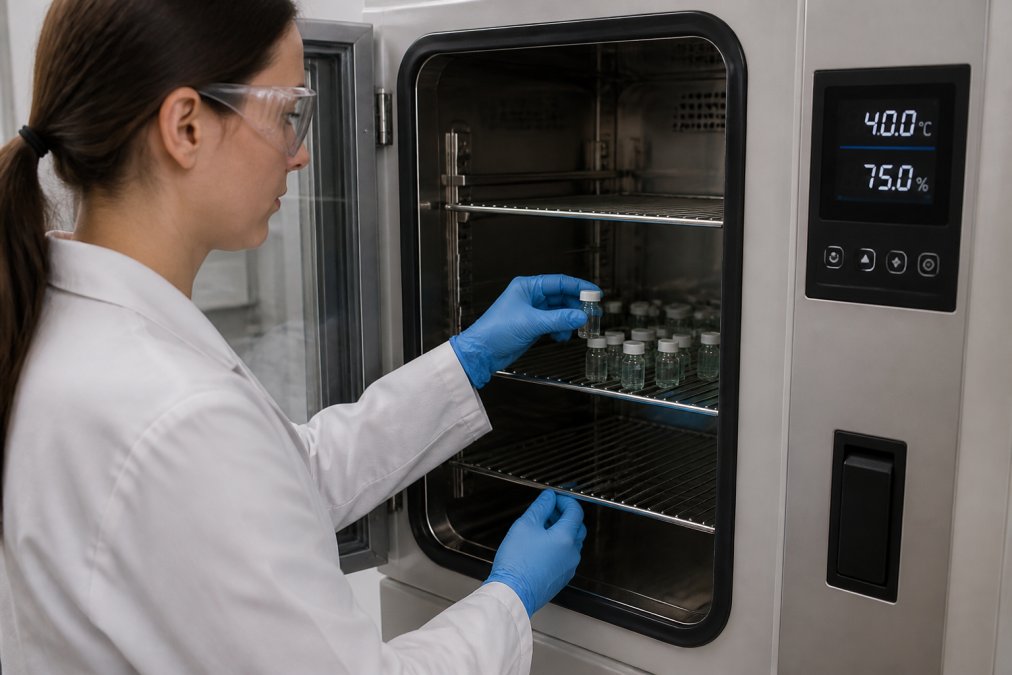
Temperature and Relative Humidity Settings
Standard accelerated conditions are 40°C ± 2°C and 75% ± 5% RH. For lyophilized peptides, humidity matters less because the product is dry, but the chamber should still hold a stable setpoint.
| Condition | Temperature | Relative Humidity | Typical Use |
|---|---|---|---|
| Long-term | 25°C ± 2°C | 60% ± 5% RH | Shelf life confirmation |
| Intermediate | 30°C ± 2°C | 65% ± 5% RH | Fallback after failure |
| Accelerated | 40°C ± 2°C | 75% ± 5% RH | Fast screening |
Step 3: Apply ICH Q1A(R2) Stability Testing Guidelines
The ICH Q1A(R2) stability testing guidelines set the framework most labs follow, even for research peptides rather than finished drugs, defining storage conditions, test frequency, batch selection, and extrapolation limits. Treat it as a checklist, not a document you skim once.
The Storage Conditions Q1A(R2) Actually Specifies
Q1A(R2) gives a decision tree based on the climatic zone where the product will be marketed, not one universal condition. For the United States (Zone II), the general case conditions are:
| Study Type | Condition | Minimum Time Covered at Submission |
|---|---|---|
| Long-term | 25°C ± 2°C / 60% ± 5% RH (or 30°C ± 2°C / 65% ± 5% RH) | 12 months |
| Intermediate | 30°C ± 2°C / 65% ± 5% RH | 6 months |
| Accelerated | 40°C ± 2°C / 75% ± 5% RH | 6 months |
Batch Count and Timepoint Rules
Q1A(R2) expects at least three primary batches: for a drug substance, at minimum pilot scale; for a drug product, at least two of three pilot scale, with the third smaller if justified. Research peptide work rarely hits those counts, so document the deviation explicitly rather than pretending the study is submission-grade.
The 6-Month Decision Rule
If significant change occurs during 6 months of accelerated testing, you must run intermediate testing. “Significant change” generally means a 5% assay change from initial, any degradation product exceeding its acceptance criterion, failure of appearance or physical attributes, or failure of pH or dissolution where applicable. If it happens within the first 3 months, the guidance calls for a discussion of short-term excursions outside the label storage condition, the kind a shipping event can cause.
Extrapolation Limits You Should Not Exceed
Q1A(R2) permits extrapolation beyond observed long-term data, but the window depends on how much real-time data you have and whether accelerated data showed change:
- With 12 months of long-term data and no significant change at accelerated, a modest extrapolation beyond the observed period is generally accepted.
- With 6 months of long-term data, the extrapolation window is smaller and must be justified statistically.
- If accelerated data showed significant change, extrapolation is limited and intermediate data becomes the anchor.
Where the FDA Guidance Fits
The FDA guidance on drug stability aligns with ICH principles and is worth reading alongside the ICH text if your work feeds into any regulatory filing. The FDA guidance adds submission-format expectations and clarifies how to present bracketed and matrixed designs, testing only the extremes of a strength range or a subset of timepoints, which can cut your assay load substantially if your peptide family supports it.
Bracketing and matrixing are not free passes. You must justify that the design covers the worst case, and the FDA can reject a bracketed design if the intermediate strengths or timepoints are not shown to be representative. Document the rationale in the protocol.
Q1A(R2) is a decision tree, not a single condition. Identify your climatic zone and storage class first, then set batch count, timepoints, and extrapolation limits from there. If your study cannot meet the batch or timepoint minimums, say so in the protocol, a documented deviation is defensible; a hidden one is not.
Step 4: Analyze Degradation Kinetics and Data Extrapolation
Degradation kinetics tell you how fast the peptide breaks down and by what route. Plot purity or potency against time, then fit a kinetic model. The model determines the rate constant, and the rate constant determines the shelf life you can defend.
Fitting the Right Kinetic Order
Most peptide degradation follows one of three patterns, and each has a different integrated rate equation:
| Order | Rate Law | Integrated Form | Linear Plot |
|---|---|---|---|
| Zero-order | rate = k | C = C₀ − kt | Concentration vs. time |
| First-order | rate = kC | ln(C) = ln(C₀) − kt | ln(concentration) vs. time |
| Second-order | rate = kC² | 1/C = 1/C₀ + kt | 1/concentration vs. time |
Calculating t90 and Shelf Life
For a first-order loss, the time to reach 90% of the initial concentration (t90) is:
t90 = ln(1.11) / k ≈ 0.105 / k
Applying the Arrhenius Equation
The Arrhenius equation links degradation rate to temperature:
k = A × e^(−Ea / RT)
where k is the rate constant, A a pre-exponential factor, Ea the activation energy, R the gas constant (8.314 J/mol·K), and T absolute temperature in Kelvin. Take the natural log of both sides and plot ln(k) against 1/T: a straight line means the data fit the model, and the slope equals −Ea/R.
Where Extrapolation Breaks Down
Extrapolating too far beyond your measured range produces numbers that look precise but carry no real weight. Three failure modes:
- Mechanism change. A peptide that hydrolyzes at 40°C may oxidize at 25°C. Different mechanism means different Ea, and the Arrhenius line bends.
- Phase change. If the formulation freezes, melts, or undergoes a glass transition within your temperature range, the rate constant no longer follows a single Arrhenius line.
- Moisture-limited kinetics. In a lyophilized cake, degradation may be limited by residual moisture rather than temperature, so temperature-only extrapolation understates the risk.
Automating the Analysis
Manual spreadsheet curve fitting works for a single study but does not scale and invites transcription errors. Most labs running more than a handful of studies use one of two tool classes:
- LIMS platforms (for example, LabWare, STARLIMS, or Thermo Fisher SampleManager) store timepoint pulls, assay results, and chain-of-custody in one system, so the kinetic fit runs against validated data rather than a hand-keyed spreadsheet.
- Statistical and predictive modeling software (for example, JMP, Minitab, or R with the
nlsandkinfitpackages) fits the kinetic order, computes t90, and runs the Arrhenius regression with confidence intervals you can put in a report.
Before you trust any automated fit, re-run the calculation by hand on one study. If the software and the hand calculation disagree, the problem is almost always in how the timepoints were entered, not in the model.
Fit all three kinetic orders, pick the one with the best R², compute t90 from the matching equation, then project to the long-term condition with Arrhenius, but only if your ln(k) vs. 1/T plot is linear. A bent line means the mechanism changed and the projection is not defensible.
Understanding Stability Testing Duration for Research Peptides
Stability testing duration for research peptides depends on the question. A screening run at 40°C/75% RH typically lasts 1 to 6 months, with pulls at baseline, 1, 2, 3, and 6 months.
A practical rule:
- Screening: 1 to 3 months, accelerated
- Confirmation: 6 months, accelerated plus intermediate
- Shelf-life claim: 12 to 24 months, long-term
Long Term Stability of Lyophilized Peptides: What Accelerated Data Can and Cannot Tell You
Long term stability of lyophilized peptides rests on low residual moisture and good vial sealing. Accelerated testing flags moisture problems fast but cannot prove a lyophilized peptide will hold two years on its own.
What accelerated data does well:
- Ranks formulations by relative stability
- Flags moisture-sensitive or oxidation-prone sequences
- Supports an interim shelf life while real-time data accumulates
What it cannot do:
- Replace real-time storage at the recommended condition
- Predict behavior if your lyophilization cycle changes
- Account for vial, stopper, or shipping stress on its own
Troubleshooting Failed Stability Tests and Reducing Costs
A failed stability test is data, not a dead end. Before scrapping the batch, find out why it failed.
Common causes:
- Moisture ingress from a poor crimp or stopper
- A method that co-elutes a degradation product with the main peak
- A chamber that drifted outside its setpoint
- A peptide sequence that is inherently prone to oxidation or deamidation
Frequently Asked Questions
What is the procedure for accelerated stability testing?
The procedure involves several steps. First, define your protocol and acceptance criteria. Next, prepare samples and store them in environmental chambers at elevated stress conditions, typically 40°C and 75% relative humidity. Then, pull samples at predetermined intervals and analyze them using stability-indicating methods like HPLC. Finally, apply degradation kinetics and the Arrhenius equation to data extrapolation. This process predicts shelf life and supports regulatory compliance.
What are the ICH guidelines for accelerated stability testing?
The ICH Q1A(R2) stability testing guidelines specify that for drug products intended for room temperature storage, accelerated studies should be conducted at 40°C ± 2°C and 75% ± 5% relative humidity for six months. For drug substances, the same conditions apply. These guidelines require a minimum of three time points, including the initial and final time points, to assess chemical and physical stability.
How long does accelerated stability testing take?
A standard accelerated stability study runs for six months. However, the stability testing duration for research peptides can be shorter if significant degradation occurs early. Samples are typically tested at 0, 1, 2, 3, and 6 months. The goal is to determine a degradation profile that allows for data extrapolation to predict long term stability of lyophilized peptides and other formulations.
What equipment is required for controlled environmental stability testing?
You need environmental chambers capable of maintaining precise temperature and relative humidity, such as 40°C and 75% RH. A stability-indicating assay like HPLC with UV detection is essential for analyzing chemical stability. You also need calibrated balances, pH meters, and sample storage vials. For photostability testing, a light cabinet is required. All equipment must be validated to ensure regulatory compliance and reliable data.